If you use an iPhone or iPad and have the necessity to scan documents or other texts, it would be really cool to know how to scan with iPhone. This function to scan directly is especially useful when you need to scan documents but you don’t have a clunky scanner nearby.
Scanning documents with an iPhone or iPad is much easier and faster than doing it in the traditional way. You can directly scan a document into the Files app as a PDF. Moreover, thanks to a good camera in the last iPhone or iPad models, the documents on your iPhone will not lose quality.
In this article, our specialists will show you the instructions for how to scan using a mobile scanner app.
How to Scan Documents Using iPhone 8 Quickly (iOS 11)
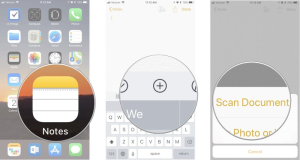
Open the app called Notes, and create a new note by pressing a button in the lower right-hand corner. Then click on the plus sign above the keyboard and choose Scan Documents in a pop-up menu.
You will see that the camera is open. The photos are taken automatically when the camera recognizes a document.
Put your scanning documents so that the camera can see them. It will scan documents automatically if your device is in auto mode. To manually take a scan, press and hold the Shutter button(or one of the volume buttons).
Tap Keep Scanning to scan additional pages and tap Save to save additional pages.
There’s a visual instruction on how you can scan documents for iOS 8 in the
How to Scan With iPhone 8 (on iOS 12+)
iPhones with IOS 12 and more have a camera icon instead of a plus, so after opening Notes and creating a folder for a new note, click on this sign(camera button). In other relations, the procedure is the same.
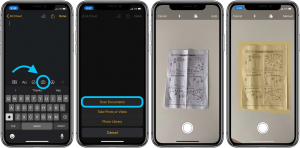
In case the function of automatic scanning doesn’t suit you (for example, if you can’t open the next pages of a document fast enough), turn it off. When the camera view is opened, press Auto in the corner of the screen to switch it to Manual. Now you should click on the button every time you want to take a scan.
If a document consists of multiple pages, just continue to take pictures one after another.
How to export a scanned document on iPhone 8
There are 2 ways to copy scanned documents in other places.
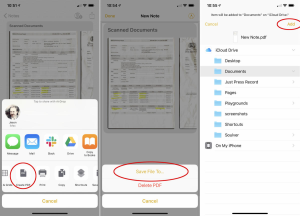
The first is to press a sign in the upper right-hand corner of the screen in a note with a document. Pick an app where a document should go (Mail, Books, Messages, or some other messenger).
The second way is to click on the picture of a scanned doc. in the note to call a context menu, then click on Share and choose an app.
In both cases, you can create a PDF file and send it to another app, for example to Documents. To do it, press Create PDF, Save File To…, choose an app from the list, and press Add.
To avoid the situation when you can not find the scanned document, it is better to keep all the scans in one folder (apps such as My Scans, and My Scanner app for Androids suit this purpose) and name them correctly, in such a way that you’re able to understand what the document is by its name.
If you use Notes and scan a lot of documents on your iPhone, Notes Plus for iPhone or iPad would be not a bad option. Its advantages are Multi-level folder management, high-quality handwriting, support for Apple Pencil and iPad Pro, and the function of converting handwriting to text. However, the minus is that the app is paid. At the time of writing this article, the cost is $9.99. Fortunately, except for Notes Plus, there are lots of free scanning apps for iPhones (like Adobe Scan).
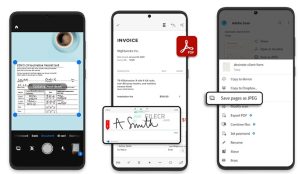
If the scanned documents that you send with an app, for example, Camscanner, are not emailing, you should check the emailing app first, because exactly it implements the operation of sending. In case you don’t see letters in Sent, look into the Outbox folder.
The structure of scanning apps is similar, so, whether it is Camscanner or U-scan, the present manual will suit any of them.
If you need to manually sign your documents, use an Apple Pencil or your finger on your device.
Read also the professional guide on how to remove crescent moon on iPhone.
How To Scan a document with an iPhone or iPad To Get a Clear Scan Result
Notes app has the function of editing the appearance of a document. Press on the icon with the circles in the middle of the lower panel. There will be 4 variants: Color, Greyscale, Black&White, and Photo. The effects are shown in the photo above. Pay attention, by default the document has a Color effect. You can also cut and turn the document if needed. A plus icon allows taking some scans which will be added to the opened document.

Besides, in conditions of lack of light, there is a possibility to turn the flash on while you’re taking a photo. Just press on the icon when the camera view appears. If you, on the contrary, want to escape turning the flash on when taking a photo, make sure to turn it off because the flash is in Auto mode by default.

As for the technique of taking a scan itself, you should control that the document is in focus (press on the place where the document is to get it to focus) and that the yellow highlighting defines the area of the document correctly. If not, you can go to Manual mode and change it by pulling the corners of the highlighted area after taking a photo.
Learn also how to connect multiple Bluetooth speakers iphone.
Final thoughts
One useful tip to get rid of all that scanning equipment is to learn how to scan documents using your iPhone or iPad. It may come as a surprise to some that you can quickly convert documents on your iPhone to a high-quality PDF file, then email it, and save (tap save) the important documents to the Files app, you can crop the most documents by selecting the crop icon, but once you do, it’s rather helpful.
Author’s recommendation: How to Quickly Edit Screenshots on iPhone 8 With Instant Markup Easily
